address


aerialview


birdsview


hybrid


measure


move


search


print


resize


roadmap


route


traffic


zoom


spacerleft border
right border

« Previous Chapter 4: Routing Back to Index Next Chapter 6: Overlays »
To make the handling of the map more comfortable for the user, we have to add some controls to it. The Api provides a comfortable way for adding elements as well as predefined controls. In this chapter, we will explain how the positioning works, then we will add some predefined controls to our map and finally we will make an own control element which we want to use in our map.
The API provides a IWLayoutManager for easy positioning of the controls. It uses a so-called "Docking-Layout". If you want to add an element, you just have to specify the direction. The element will be "shoved" to this side, and docks either to the border of the map, or, if there is another element already, it docks to that element. A simple example will show you how it works theoretically.
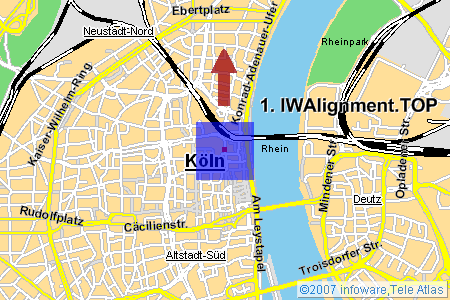
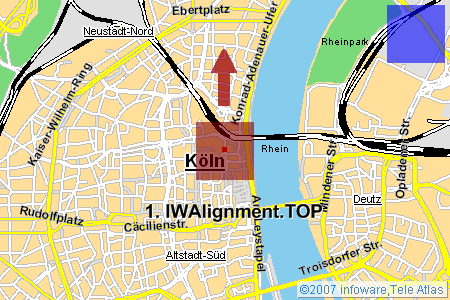
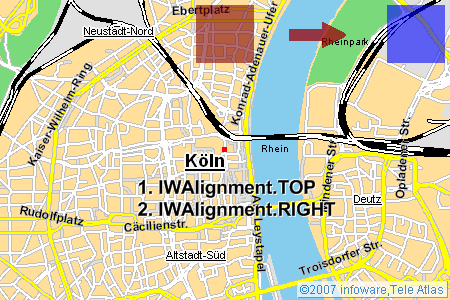
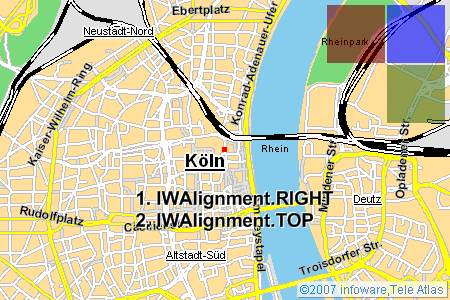
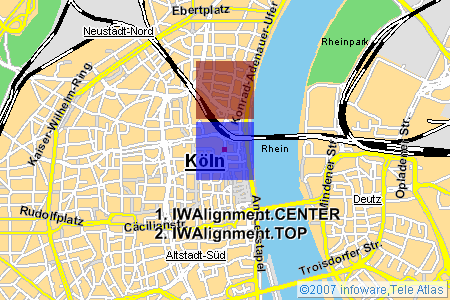
There are always two docking commands necessary to add an element to the map. If we want to see our control element in the upper right corner, we can to dock it at first to the top border, and then to the right. (Notice: As there is no other element on the map, it would make no difference if we dock it at first to the right, and then to the top border.) For docking the element to the top we use the constant IWAlignment.TOP. Similar to this constant there are IWAlignment.BOTTOM, IWAlignment.LEFT, IWAlignment.RIGHT and IWAlignment.CENTER.
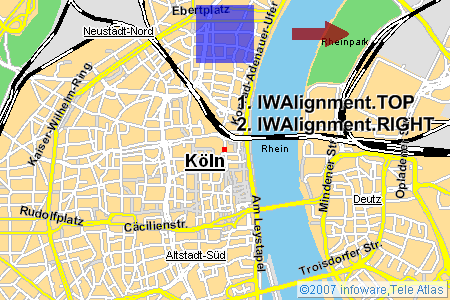
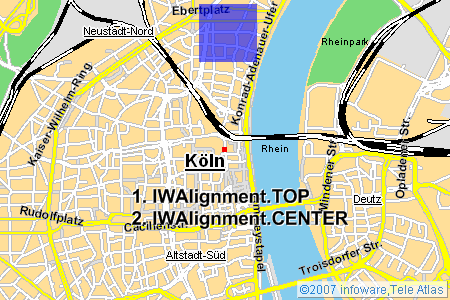
Now, we want to add another control element at the top beside the existing one. The order we are docking is important here. We have to dock it at first to the top, and then to the right.
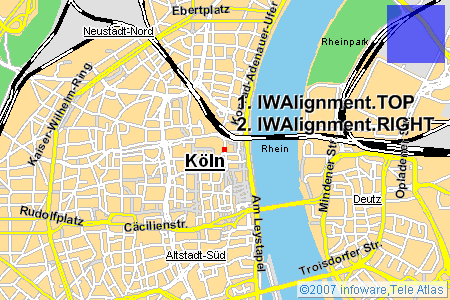
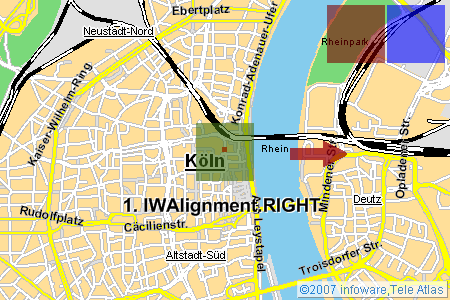
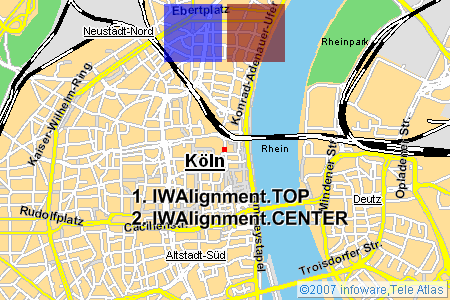
If we change the order, the new control element will be added at the right side below the existing control element.
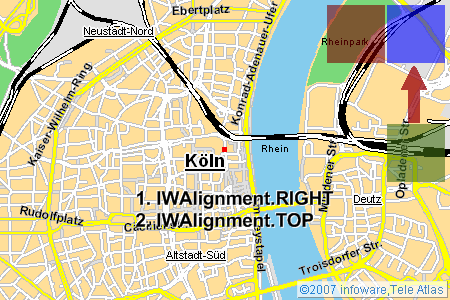
And of course, if we dock an element to the center of a side, the elements will be centered automatically.
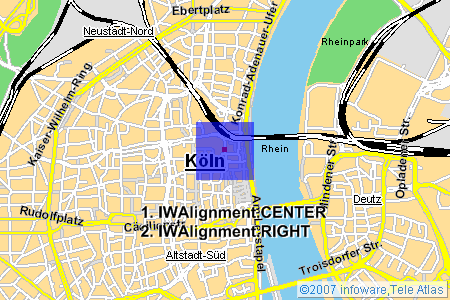
For the exceptional case that you want to add elements to the center of the map, just use IWAlignment.CENTER as first docking command. The first element will always be set in the center of the map. Following elements will be docked according to the second command.
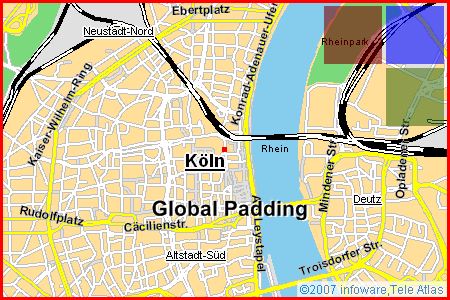
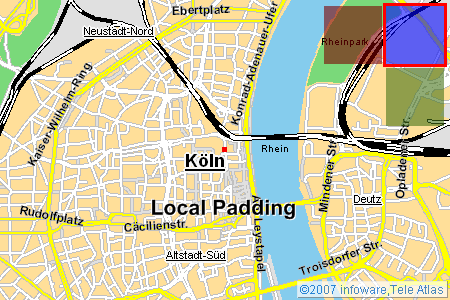
You can define a global spacing to the borders of the map as well as for each element a local one.
As we now know how the Layoutmanager works, we will create a map and add some predefined control elements.
 Controls example 5a
 Source code example 5a:
<!DOCTYPE html>

<html>
	<head>
		<title>Chapter 5: Controls example 5a</title>


		<script type="text/javascript" >

			var map = null;

			function initialize()
			{
				map = new IWMap(document.getElementById('map'));

				IWEventManager.addListener(map, 'oninitialize', function()
				{
					// add some controls
					map.getLayoutManager().getLayer(0).setBorder(5, 5);
					map.getLayoutManager().getLayer(0).addControl(new IWScalarControl(map), IWAlignment.LEFT, IWAlignment.BOTTOM, 0, 0);
					map.getLayoutManager().getLayer(0).addControl(new IWNavigationControl(map), IWAlignment.RIGHT, IWAlignment.TOP, 0, 0);
					map.getLayoutManager().getLayer(0).addControl(new IWSliderControl(map), IWAlignment.RIGHT, IWAlignment.TOP, 0, 0);

					// create a toolbar control and add it to the map
					var toolbar = new IWToolbarControl(map);
					toolbar.addItem(new IWToolbarItem('leftBorder'));
					toolbar.addItem(new IWToolbarItem('address'));
					toolbar.addItem(new IWToolbarItem('search'));
					toolbar.addItem(new IWToolbarItem('spacer'));
					toolbar.addItem(new IWToolbarItem('print'));
					toolbar.addItem(new IWToolbarItem('rightBorder'));
					map.getLayoutManager().getLayer(0).addControl(toolbar, IWAlignment.TOP, IWAlignment.CENTER);

					//add listeners on tooolbar
					IWEventManager.addListener(toolbar, 'onappendstart', function(e) { formatToolbarItem(e.item); });
					IWEventManager.addListener(toolbar, 'onmouseover', function(e) { formatOnMouseOver(e.item); });
					IWEventManager.addListener(toolbar, 'onmouseout', function(e) { formatOnMouseOut(e.item); });
					IWEventManager.addListener(toolbar, 'onclick', function(e) { alert('user clicked: ' + e); });

					// add a overview map
					map.getLayoutManager().getLayer(1).setBorder(0, 0);
					map.getLayoutManager().getLayer(1).addControl(new IWOverviewMapControl(map, map.getCurrentMapType().getName()), IWAlignment.LEFT, IWAlignment.TOP, 0, 0);
				});

				IWEventManager.addListener(IWLoader, 'onmoduleload', function(event)
				{
					if (event.name == 'controls') {
							map.setCenter(new IWCoordinate(7.096311, 50.732705, IWCoordinate.WGS84), 5);
					}
				});
				IWLoader.loadModules(['controls']);
			}
		</script>

	</head>
	<body onload="initialize();">
		<div id="map" style="background-color: #dddddd; width: 450px; height: 300px"></div>
	</body>
</html>
As you can see, adding controls is very simple. A new concept we introduced here are the layers. With the method getLayer() you can get specific layers. The higher the number for the parameter is, the more in front are the controls on the map. Each layer is completely independent to each other. Therefore each layer has its own global padding, and controls cannot be docked to controls in other layers.
map.getLayoutManager().getLayer(0).setBorder(5, 5);With this code we set the global padding for layer 0 horizontal and vertical to 5 pixel.
map.getLayoutManager().getLayer(0).addControl(new IWScalarControl(map), IWAlignment.LEFT, IWAlignment.BOTTOM, 0, 0);Here we add a new scalar control. The control takes the map as parameter, because it wants to communicate with it. The last two parameters define the local padding for this control.
The example above demonstrates the use of the IWLayoutManager and its IWLayer`s. To allow user interactions we prefer a user defined toolbar control which contains items e.g. for switching the map type, printing the map or opening the routing window. Its up to the user to build the graphical and logical part of this control. The API contains two classes and several images to realize the implementation of this control in a few steps. The following example gives you a short summary of the required steps.
First we instantiate an empty IWToolbarControl where we can add the toolbar items later.
var toolbar = new IWToolbarControl(map);After we have create the toolbar control we can create several items by instantiating the IWToolbarItem class. At this point we do not make a difference between functional and non-functional toolbar items such as borders and spacers. We use a unique name for each toolbar item so that we can refer the item later by its name.
var spacer = new IWToolbarItem('spacer');
var item1 = new IWToolbarItem('address');
var item2 = new IWToolbarItem('search');
var item3 = new IWToolbarItem('print');
Before we add a item to the toolbar control we have to define event listeners. The toolbar control triggers the following events:
| Event | Description |
|---|---|
onappendstart |
This event is triggerd before a item is added to the toolbar. Use this event to realize your own layout. |
onmouseover |
This event is triggered when the mouse pointer is over a toolbar item. You can use this event e.g. to realiue a hover effect. |
onmouseout |
This event is triggered when the mouse point has leave the area of the toolbar item. |
onclick |
This event is triggered when the user clicked a toolbar item. |
onremove |
This event is triggered after a item has been removed from the toolbar. |
The layout of the item is set by his item.setNode(layout) method, where layout is a DOM-Element. Here is an example:
function formatToolbarItem(item)
{
	//...
	var div = document.createElement('div');
	div.style.position = 'absolute';
	div.style.top = '0px';
	div.style.height = '58px';
	div.style.width = '50px';

	var image = document.createElement('img');
	image.style.width = '50px';
	image.style.height = '58px';
	div.appendChild(image);

	var label = document.createElement('div');
	label.style.position = 'absolute';
	label.style.left = '0px';
	label.style.top = '37px';
	label.style.width = '50px';
	label.style.height = '21px';
	div.appendChild(label);

	item.setNode(div);
	//...
}
The following table contains a list of images that you can use to create your own toolbar control. Certainly you can use also your own images.
| Name | Images | |||
|---|---|---|---|---|
address |
|
|
|
|
aerialview |
|
|
|
|
birdsview |
|
|
|
|
hybrid |
|
|
|
|
measure |
|
|
|
|
move |
|
|
|
|
search |
|
|
|
|
print |
|
|
|
|
resize |
|
|
|
|
roadmap |
|
|
|
|
route |
|
|
|
|
traffic |
|
|
|
|
zoom |
|
|
|
|
spacer |
||||
left border |
|
|||
right border |
|
|||
To remove a control from the map, you can use the removeControl method from the layer where the control has been appended.
Please notice that the removeControl method requires the control reference as parameter. So if you want to remove a control, you should use the addControl and removeControl method in the following way:
var scalarControl = new IWScalarControl(map);
map.getLayoutManager().getLayer(0).addControl(scalarControl, IWAlignment.TOP, IWAlignment.CENTER, 0, 0);
...
map.getLayoutManager().getLayer(0).removeControl(scalarControl);
We know that in some cases it is very important to inform a control element that it was removed from the map. So the removeControl method calls two callback methods on the control. The beforeRemove method is directly called before the control element is removed from the map and the afterRemove method will be called when the control has been removed. Overwrite this two methods if you require some special behaviour when the control is removed.
Adding custom controls to the map is easy. You just have to regard two points:
In the next example we will create a simple control. It will just contain a simple link which sets the center of the map to Bonn, Germany.
Controls example 5b
Source code example 5b:
<!DOCTYPE html>

<html>
	<head>
		<script type="text/javascript" src="http://iw.mapandroute.de/MapAPI-1.1//js/core.js?vnr=0&pnr=0"></script>
		<script type="text/javascript">

			var map = null;
			function MyControl(map)
			{
				//calls the superclass
				IWControl.call(this, map);

				//getting the DIV Container we can work with
				var div = this.getContainer();
				div.id = 'myControl';

				// setting the style
				div.style.width = '50px';
				div.style.height = '20px';
				div.style.textAlign = 'center';
				div.style.fontWeight = 'bold';
				div.style.padding = '10px';
				div.style.border = '2px solid';
				div.style.backgroundColor = '#eeeeee';
				div.style.cursor = 'pointer';

				//create the text node
        		div.appendChild(document.createTextNode('To Bonn'));

				IWEventManager.addDomListener(div, 'onclick', function(){
					map.setCenter(new IWCoordinate(790593, 6574033, IWCoordinate.MERCATOR));
				});
			}

			//implement the interface IWControl
			MyControl.prototype = new IWControl();

			function initialize()
			{
				map = new IWMap(document.getElementById('mapContainer'));

				IWEventManager.addListener(map, 'oninitialize', function()
				{
					// add the new control element to map
					var myControl = new MyControl(map);
					map.getLayoutManager().getLayer(1).addControl(myControl, IWAlignment.BOTTOM, IWAlignment.CENTER, 0, 0);
				});

				IWEventManager.addListener(IWLoader, 'onmoduleload', function(event)
				{
					if (event.name == 'controls') {
						map.setCenter(new IWCoordinate(6.951698, 50.922106, IWCoordinate.WGS84));
					}
				});
				IWLoader.loadModules(['controls']);
			}
			</script>

	</head>
	<body onload="initialize();" class="tutorial">
		<div id="mapContainer" style="background-color: #dddddd; width: 450px; height: 300px"></div>
	</body>
</html>
As usual we will have a closer look at the important lines of code:
With the function MyControl(map) we define a class for our new control.
To declare this class as an IWControl it must implements the interface IWControl with this line:
MyControl.prototype = new IWControl();To call the super class constructor we can use IWControl.call(this, map); where this is our own control. Once
this is done, we get the div we can use for creating our control with the method getContainer().
It is important to set the correct size (width and height) of the container. Otherwise the IWLayoutManager isn't able to place the controls correctly.
The following example demonstrates how you can customize the layout of the existing controls by overriding css attributes and/or use control specific attributes. (e.g. IWScalarControl)
Controls example 5c
Source code example 5c:
<!DOCTYPE html>

<html>
	<head>
		<script type="text/javascript" src="http://iw.mapandroute.de/MapAPI-1.1/js/core.js?vnr=0&pnr=0">

		<style type="text/css">

			/* Here we override the CSS Sytles for the IWScalarControl */

			.IWScalarControl {
				border-bottom:1px solid #8c8c8c;
			}

			/* ...*/
		</style>

		<script type="text/javascript">

			var map = null;

			function initialize()
			{
				map = new IWMap(document.getElementById('map'));

				IWEventManager.addListener(map, 'oninitialize', function()
				{

					map.getLayoutManager().getLayer(0).setBorder(5, 5);

					//customize the IWScalarControl using specific setter of a control
					var scalarControl = new IWScalarControl(map);
					scalarControl.setDarkImage('../tutorial/img/8c8c8c.gif');
					scalarControl.setBrightImage('../tutorial/img/e8e8e8.gif');
					scalarControl.setSeparatorImage('../tutorial/img/8c8c8c.gif');
					map.getLayoutManager().getLayer(0).addControl(scalarControl, IWAlignment.BOTTOM, IWAlignment.LEFT, 0, 0);

					//customize other controls
					//...
				});

				IWEventManager.addListener(IWLoader, 'onmoduleload', function(event)
				{
					if (event.name == 'controls') {
						map.setCenter(new IWCoordinate(6.951698, 50.922106, IWCoordinate.WGS84));
					}
				});
				IWLoader.loadModules(['controls']);
			}
			</script>

	</head>
	<body onload="initialize();" class="tutorial">
		<div id="map" style="background-color: #dddddd; width: 450px; height: 300px"></div>
	</body>
</html>
« Previous Chapter 4: Routing Back to Index Next Chapter 6: Overlays »
Copyright Sun Nov 24 12:17:43 CET 2024 infoware GmbH